Happy Thanksgiving!

The original plans for my contribution to Thanksgiving dindin at my parents house was going to be little baby pumpkin pies made with my mini pie maker. Needless to say, I am having a tough time carrying out that plan because I am just so exhausted.

Yesterday was our goddaughter’s first birthday and we were more than happy to celebrate with her parents, as well as paternal grandparents last night over the birthday baby’s favourite meal: Indian take-out, believe it or not ^_^

She is a pretty adorable Iittle girl and as a wonderful surprise to everyone, she took her first real walking steps without holding onto anyone last night after dinner!

With the weather changing, the sun is going down again earlier every night and so my internal clock is totally whacked out. When we left for home last night, I thought it was about 930pm, when in fact it was only just about 845pm — not that it really mattered, the birthday girl was pretty much ready to call it a day by that point since she as starting to get the beginnings of a sugar crash from her birthday cake consumption anyhow.

By the time we got home, I was in pain, so there was Moose involved again, but I really didn’t want to go to bed just yet, so I ended up starting Project #Ranma! Amigurumi #2 — Pachirisu! once I was comfortably settled & cozy in bed at around 930pm.

By the time I woke up this morning, I felt pretty miserable — exhausted, more pain, groggy and just all around bleh. All the plans I had for making my baby pumpkin pies was pretty much gone and thrown out the window. I was going to make all the pastry cases today, have them rolled & cut out so they would be prepped for the Sunday morning bake-off and then in the afternoon I could do other things like roast the two spaghetti squashes we got from the CSA to bring for dindin. The plan was that I would just have to make the filling, bake eight to twelve little pies and then leave them alone for a few hours afterwards to make sure they had more than ample time to cool down before we packed everything up in my cupcake carrier to bring over to Mom & Dad’s for dinner at 6pm.

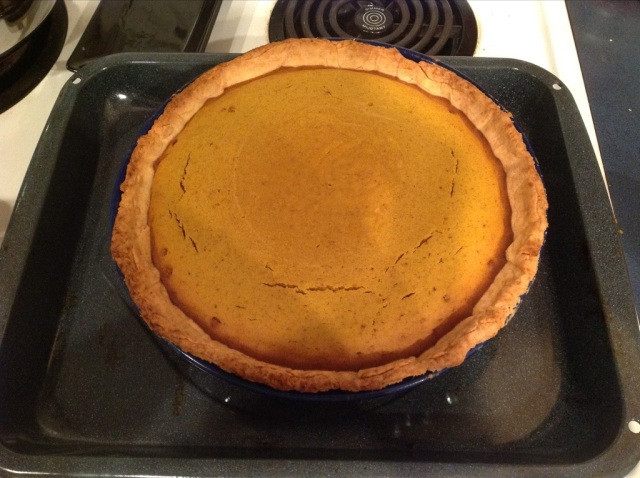
Sadly, my little pies won’t be accompanying us to dindin tomorrow, but instead, we will just be bringing one deep dish pumpkin pie. I was really looking forward to the idea of giving everyone their own pies, each served with a happy blob of whipped cream in the middle, or perhaps entirely covering the whole thing, depending on how each person wanted to enjoy their pie.

Maybe I will try and plan for mini pumpkin pies when we next play D&D since I have so much pumpkin purée in the freezer now — the grocery store ran out of canned pumpkin when I went shopping on Thursday, so instead of driving all over the place trying to find some, I decided to buy a Japanese pumpkin, roast it at home and purée it myself.

This was my first try at making a pumpkin pie from scatch-scratch and I am hoping that it will taste better than a store-bought pie or one made with canned pumpkin. It has to, right? It’s homemade!

The recipe I used was actually two Williams Sonoma pumpkin pie recipes that I combined together to make my own version of their deep dish spiced pumpkin pie recipe. The first recipe was for classic pumpkin pie which also includes the recipe for deep dish pie crust. The second recipe was for a spiced pumpkin pie and originally piqued my interest because it used fresh pumpkin, more spices and less sugar — all of which are bonuses, in my opinion.

If I used this recipe to make mini pumpkin pies, I don’t know how many pies you would get out of one recipe’s worth of pastry & filling. The recipe below is obviously for just the one deep dish pie, but should I ever get a chance to make them in mini pie form, I will update the recipe at the end.

The crust recipe below is supposed to be divided in half so you get two discs — one to be used to make the crust and the second to be used to make a whole shwack of pretty, decorative, pastry leaves to be used for the rim of the pie crust. You can do as you see fit. Personally, I will just use the dough at a later date for a second pie and am just chucking that second disc into the freezer until then.

One other note — I don’t own “pie weights” and I am of the opinion that using a whole pie’s worth of beans, lentils, rice or what have you, in place of said weights, is a shameful waste. I don’t know if people will take issue with what I’ve chosen to do instead, but what I just lined the crust wih a piece of parchment paper and then put a regular-sized glass pie plate on top. I baked the whole thing as per normally instructed for blind baking and it seems to have turned out perfectly fine. No useless pie weights floating around taking up space and no waste of perfectly good dried pantry staples. ^_^

Deep Dish Pumpkin Pie

For the filling:
2 cups pumpkin purée
1/4 cup maple syrup
1/4 cup firmly packed light brown sugar
1 Tbsp cornstarch
1 1/2 tsp. ground cinnamon
1 tsp. ground ginger
1/2 tsp. freshly grated nutmeg
1/4 tsp. ground cloves
3 eggs, beaten
1 cup heavy cream
1/3 cup milk

For the crust:
2 1/2 cups flour
2 Tbsp sugar
2 tsp salt
1 cup butter, cut into pieces
6-8 Tbsp ice water

Crust directions:
In a food processor, combine the flour, sugar & salt. Pulse to combine.
Add butter, pulse until the mixture resembles coarse meal.
Add 6 Tbsp ice water and pulse twice. If it’s still too dry, add 1 Tbsp more water at a time, pulsing twice after each addition.
Turn the dough out and divide in half. Shape each into a disk, wrap with plastic wrap & refrigerate for at least 2 hours.

When ready to bake, take the dough out of the fridge and let stand for 5 minutes.
Roll out one of the discs into a 12″ round and transfer to a 9-inch deep-dish pie pan.
Trim the edges as needed and make pretty edges if desired.

Preheat the oven to 400°F.

Line the piecrust with parchment paper and fill with pie weights and bake for 20 minutes.
Carefully remove the parchment and weights and bake about 5 minutes more. Transfer to a wire rack and let cool completely.

Meanwhile, reduce the oven temperature to 375°F.

In a small bowl, whisk together the cornstarch, cinnamon, ginger, nutmeg and cloves.
In a food processor, combine pumpkin, brown sugar and maple syrup. Add the spice mixture, eggs, cream and milk and whizz to combine.

Pour the filling into the prebaked piecrust and bake until the center is set, 60-65 minutes. You may need to consider covering the edges of the crust with aluminum foil after 30 minutes if they brown too quickly.

Transfer the pie to a wire rack and let cool completely, at least 2 hours, before serving.
20121006-220546.jpg

Vacation photos are coming! I promise!

Man, it’s a lot of work to sift through 8 days worth of photos (almost 1000 of them!) just so you can create a “small” album that is a nice reflection of your trip, but won’t bore people to death as they look at all the pictures…

It’s just so ridiculous how easy it is to just shoot off hundreds of photos now that people no longer develop film! Now vacation photos are even more boring than before if you’re forced to sit through someone’s slideshow if they haven’t weeded out duplicates

I’m kina disappointed that photobucket doesn’t keep the pics that you upload in the order that you upload them. It makes no sense to be looking at vacation photos backwards. *sigh*

So instead of spending all my time in front of my laptop sifting through the photos yesterday, I made turkey potpie for The Hubbs in hopes that it entices him to eat & get over his cold faster… then I would get back to the grind of uploading more Cruise photos…

I actually got the recipe from the May issue of Martha Stewart Living’s FOOD digital magazine — speaking of: Have I mentioned how in love I am with digital subscriptions to magazines?? OMG! The number of magazines I can have now, which take up ZERO room in the house all at once, and not killing a single tree! I’m thrilled! Not only that but I can even have the back issues at my fingertips if I so choose and I can bookmark all the recipes to my heart’s content!

Admittedly, some magazines are made a lot better than others (MSL, I’m totally looking at you!)… and I’m still waiting for the Jamie Oliver Magazine to come back to iPad, they certainly do make me happy.

ANYHOW!

I didn’t actually alter the recipe too much, surprisingly: I substituted leftover turkey for chicken, omitted the parsley and added about 2 sticks of celery in small dice. I even made the turkey broth from scratch using the frozen turkey pieces leftover from my birthday turkducken and then shredding the meat for the recipe! The one significant change I did make was to double the pie crust so I could make six baby pies with my pie maker (it was needing some serious lovin’. I haven’t used it since the beginning of the year!) instead of baking one large pie.

The one thing I am rather baffled by is that this recipe serves SIX.

As a calorie-saving measure, I’ve noticed that a lot of recipes, nowadays, no longer use double crusts for pot pies and that makes me sad. Half the enjoyment of a potpie is that you get a top and bottom crust! Most of this pie is in fact filling. On the other hand, there’s probably a large number of people who will argue that the filling is where it’s at for a pot pie. If you’re one of those people, then this is the recipe for you: it makes about 2 quarts-worth. It’s friggin’ huge!

When using my pie maker, I can only use 1/3 cup filling per pie. In my opinion, that’s the perfect ratio of crust to filling, in the case of an individual pot pie. Using only 2 cups of filling, total, to make my pies, I put the rest of it into the freezer for another day — be it if we want to have just turkey stew OR thaw it out and make more pot pies with it. To be honest, if you just made the filling on its own, and served it with some soft squishy buttered buns, that would probably make just as satisfying a meal if you didn’t feel like going near crust-making.

Turkey Potpie

If making individual pies, make 2 recipes of the crust, below:
1 1/4 cups flour
1 tsp sugar
1/4 tsp salt
1/2 cup cold butter, cut into pieces
3-5 Tbsp ice water

5 Tbsp butter
1 onion, diced
4 carrots, diced
2 sticks celery, diced
2 garlic cloves, minced
1/2 cup flour
4 cups turkey broth
1 cup frozen peas
salt & pepper, to taste
3 cups shredded cooked turkey

Note: If making baby potpies, make 2 recipes of the crust
In a food processor, pulse together flour, sugar, and salt.
Add butter and pulse until mixture resembles coarse meal.
Sprinkle with 3 Tbsp ice water.
Pulse until dough is crumbly but holds together when squeezed (if necessary, add up to 2 tablespoons ice water); do not overmix.
Form dough into a disk, wrap tightly in plastic, and refrigerate until firm, 1 hour or overnight.

In a large pot, melt butter over medium-high.
Add celery, onion and carrots and cook until softened.
Add garlic and cook until fragrant.
Add flour and stir to coat vegetables.
Slowly add broth, whisking constantly until sauce is smooth.
Bring to a boil, reduce heat, and simmer until thickened. Stir in peas.
Season with salt and pepper, then stir in turkey.
Set aside filling to cool until ready to make pie(s).

If making baby potpies:
Roll out first disc of pastry 1/8″ thick and cut 6-8 bottom crusts. Set aside.
Roll out second disc of pastry 1/8″ thick and cut 6-8 top crusts. Set aside.
Preheat pie maker until hot.
Place bottom crusts in pie maker, fill with 1/3 cup cooled turkey filling, place top crusts and close pie maker.
Cook ~9 minutes or until crust is golden brown.

For large potpie:
Preheat oven to 375°
Pour filling into a 2-quart baking dish.
Roll out dough to 1/8-inch thickness.
Place dough over dish and fold overhang inward while pinching to crimp edge.
Cut vents in dough.
Bake until crust is golden brown and filling is bubbling around edge, 45-50 minutes.
Let cool 15 minutes before serving.

Pie filling recipes & thoughts on pie

Last week (year!), I made apple pie filling so I could bring a dozen mini apple pies to D&D for dessert.

I’ve made a couple of apple pies before, but never pie filling which could then be bottled up and stored for a later date to be used make a practically instant pie. In fact, I’ve never even purchased pre-made apple pie filling before because that always seemed like a really strange concept to me — why would you use canned apples when real apples are rather common place in most everybody’s kitchen?

The only pre-made canned stuff I’ve had the experience of eating before is cherry, and that was only ever used to top my mom’s apple cheesecakes. OH wait, no, I think I tried blueberry pie filling when I was going through that experimental and short-lived flavrcake (aka dump cake) phase. I have discovered that canned pie filling, with the exception of cherry, is really weird tasting to me. The gloppiness and overly sugared fillings just don’t do it for me, so I think I may be seriously spoiled in the pie department when pies are actually in my presence.

Researching apple pie fillings, I discovered that they have quite a bit of sugar in them, at least to me, there seems to be a rather large quantity of sugar in each recipe I’ve looked at. I don’t know if this is because people naturally like their pies excessively sugar-laden and it’s the norm, or I am just hyper-sensitive to the taste of sugar in general.

Anywho, after spending a good couple of hours trying to find something that sounded appealing to put inside my mini pies, I finally settled on a recipe I found on BigOven. I looked at all the submissions to allrecipes.com and for some reason they were all the same recipe — every single one of them, the only difference was the title. One fairly good example of what I was looking at was this recipe called Apple Pie in a Jar. Four and a half cups of sugar!? REALLY?? O_O;;; Wowsers.

Needless to say, these recipes really made me uncomfortable and so I kept on diligently searching for something that sounded a little less sugar-laden. Maybe I should take into consideration that the 4 1/2 cups of sugar is for 7 quarts of apples. But still… compared to the amount of sugar I ended up using for ~5 quarts of apples I chopped, there’s a pretty big difference.

Anyhow, I finally found something that was a little more to my liking and used that as my guide — I tweaked the recipe somewhat since I used more apples than the recipe called for because I had quite a few sad looking apples that had started becoming wrinkled and quite a few large ones in the fridge that Mom had bought me that really needed a purpose to fulfill their wonderful apple-y lives. Since I used quite a few apples and it filled my 5 quart dutch oven by the time I was done chopping, I was going by eye & feel more than anything else with regards to how much flour & sugar to add. The original recipe for Apple Pie Filling can be found here.

The resulting pie filling, once I figured out what extra spices to add, was really satisfying — not too sweet, a smidgen bit of tartness and the perfect amount of extra spices. I realize that apple pies are probably pretty easy to make by most peoples’ standards, but pie-making is a relatively new undertaking for me and I am pretty darned pleased by the results I’ve had so far.

The other pies I’ve made this week are also quite impressive: Japanese Bison Curry and Pear Mincemeat.

The pear mincemeat was from Miss R and it was really, really yummy. If I remember correctly, I think she found the recipe out of the Company’s Coming Preserves book. I mentioned a couple days ago that the recipe for the pastry that I used for the mincemeat pies was a little excessive and seemed to be kind of overkill in the amount of butter it uses and probably wouldn’t be my first choice for a savoury pie recipe. Turns out I was wrong and it makes for a fabulous base for savoury pies, too! Yea, it’s still crazy in terms of the amount of butter it calls for, but in the end, it’s a really nice crust that is easy to make, doesn’t cause any angst when making it, and tastes great. Yay for butter.

The curry filling I made was easy, easy, easy: Japanese curry roux FTW. I don’t think I need to say much more than that. I used 2lbs(?) of thawed bison stew meat that I seared in batches, fried off an onion, three sticks of celery and two carrots, all peeled, roughly chopped and then covered everything with water and a splash of red wine vinegar after I dissolved a package of the Japanese curry mix. I let it simmer away for a good four hours and then let it cool down and tossed it into the fridge until Friday morning when I made the pies for my weekly get together with Miss R & Lil’ E=MC^2. The awesome thing was that we managed to have everyone join us for the first time and it was nice seeing everyone before the end of the year.

Apple Pie Filling

6 medium apples, ~2lbs (I used 4 LARGE + 3 medium)
1/3 cup Sugar
2/3 cup Brown sugar
4 Tbsp Flour
3 Tbsp Lemon juice
1 tsp Cinnamon
1/2 tsp Nutmeg
1/2 tsp Allspice
1 cup water

Peel, core and chop apples.
In a large dutch oven, toss apples with remaining ingredients except water and let stand for 30 minutes.
Add water and cook gently over medium heat until mixture begins to thicken and apples soften a little.
Cool filling and pour into 1/2-gallon size freezer bags.
Seal, label and freeze.
Use 1/3 cup of filling per mini pie.

Japanese Curry Meatpie Filling

2lbs bison stew meat
olive oil
1 onion, peeled & chopped
3 stalks celery, chopped
2 carrots, peeled & chopped
water
generous splash of red wine vinegar
1 box Japanese curry roux
salt, pepper

In a large dutch oven, heat olive oil to sear bison pieces over medium heat, in batches, until pieces are nicely browned on all sides.
Set browned pieces aside and continue with the rest of the meat, adding extra olive oil as needed.
Once all the meat has been seared, set aside.
To the pot, add the onion, celery and carrots, season generously with salt and pepper and scrape off all the yummy bits as the veggies cook.
Once pot looks nicely cleaned and veggies are softened, add the meat and all the resting juices back into the pot and mix thoroughly.
Turn temperature up to medium-high, add enough water to the pot just cover the meat and add a generous splash of red wine vinegar.
Break up the curry roux blocks and stir into the stew to dissolve.
Once the stew comes up to a boil, turn down temperature to a gentle simmer, cover and let cook until the meat is tender, about 4+ hours.
Take pot off the heat and let stew cool completely before using as pie filling, preferably overnight.
In the meantime, get yourself a bowl of rice, top with however much curry you’d like and dig in — make the pies tomorrow!
Use 1/3 cup of filling per mini pie.