Still lovin’ the homemade pasta thing…

Wow… I can’t believe I’m making fresh pasta and I think I’ve finally got the hang of it!

I noticed that making pasta for six, the original method I used didn’t quite work to my satisfaction and today, on my third attempt, I had a much better feel for what I was doing while using the mixer.

The key to making the dough is starting off with the paddle attachment, letting it do its thing until you have a crumbly mixture, then switch to the dough hook and let it continue mixing until it’s a more or less cohesive ball, adding only the tiniest dribbles of water if it absolutely needs it to get things to stick together. Once it’s made into a ball, turn it out, cover it with a bit of plastic wrap and leave it alone for at least 30 minutes.

Using this method, the dough cooperated so much better today, than it did on New Year’s Eve, when I was making linguini.

As a result of all my hard work & persistence, I am proud to announce: I made cannelloni!

Baked cannelloni

I am still in awe that I made cannelloni.

Homemade.

From scratch!

The original plan was to make lasagna, but for whatever reason, I decided that I just didn’t feel like doing that today. Actually, I was supposed to do a lot of things with this recipe, but I kept waffling over one thing or another and eventually ended up with what you see in the picture above.

Trying to find a suitable recipe for my needs, I noticed that a lot of recipes require you to cook your meat before using it as a filling and I’m not entirely sure why. Another thing I noticed was that the majority of the recipes for chicken lasagna I found online use an alfredo or bechamel-based sauce instead of tomato. As much as I enjoy a good cream sauce, it’s not exactly the most friendly meal for those of us who are lactose-intolerant, believe me.

I tried so hard to find a recipe that I was keen on making, but in the end, I just cobbled together something out of my head and I am rather proud of the results. Plus, with the leftover filling and pasta that remained, I finally made the ravioli I kept hoping I would make someday!

I just made enough cannelloni for myself & The Hubbs to have dinner, plus a portion for him to have a single lunch later in the week. I think if I had made an effort to make all the cannelloni possible with the ingredients listed in my recipe, it would have made about a dozen cannelloni.

One thing I should mention that isn’t written in the recipe, and I would highly recommend, is: Make sure you use a generous amount of sauce when baking the cannelloni, as the uncooked pasta absorbs as much liquid as it can from the sauce that it bakes in. If there isn’t enough, the cannelloni will potentially dry out, sticking to your pan, and making the cannelloni itself not tender enough. Plus, The Hubbs mentioned that he likes it when everything is saucier while he’s eating.

Homemade Ravioli

Even after making a few pieces of ravioli, there were still many pieces of leftover pasta sheets remaining. Those bits’n’bobs I cut into even smaller pieces with my pasta wheel and left them out to dry completely, so they can be used for soup noodles or a quick late night snack.

I have to say, I am pretty darn chuffed with this pasta-making thing ^_^

Chicken, Ricotta & Spinach Cannelloni

Filling ingredients:

6 boneless, skinless chicken thighs
1/2 tub ricotta cheese
1/3 cup grated parmesan cheese
1/2 a package of frozen spinach, thawed and all the water squeezed out
1 egg
minced garlic
salt, pepper

To assemble:
your favourite pasta sauce, homemade or jarred
fresh pasta made with 300g of flour + 3 eggs
parmesan & mozzarella cheese for sprinkling on top

Begin by making your pasta dough and set the dough aside until ready to use, at least 30 minutes.
If needed, make your sauce and set aside until ready to use.

To make the filling: grind the chicken thighs in a food processor (or meat grinder, if you happen to own one) until you have a fine mince.
In a large bowl, mix together the ricotta, parmesan cheese, and spinach until well combined. Season to taste.
Add the chicken mince & egg and with clean hands, combine until you have a relatively homogeneous filling mixture. Set aside in the fridge.

Time to roll out your pasta sheets!

Roll the pasta dough until it’s your desired thinness — on my kitchen aid, for lasagna/cannelloni sheets, I rolled it until I reached #5. Make sure to flour your dough well so it doesn’t stick to the rollers and place the sheets somewhere to dry slightly until the rest of your dough has been rolled out.

When you’re ready to assemble the cannelloni, take out your filling & preheat oven to 425F.

Cover the bottom of a 9×13″ casserole dish with enough sauce so that you have a generous layer to nestle in the filled cannelloni.
One sheet at a time, cut each of the pasta sheets to about the length of your hand, then place about 1/3 cup of filling along the bottom of each and roll the pasta to enclose everything, as below.

20130103-110622.jpg

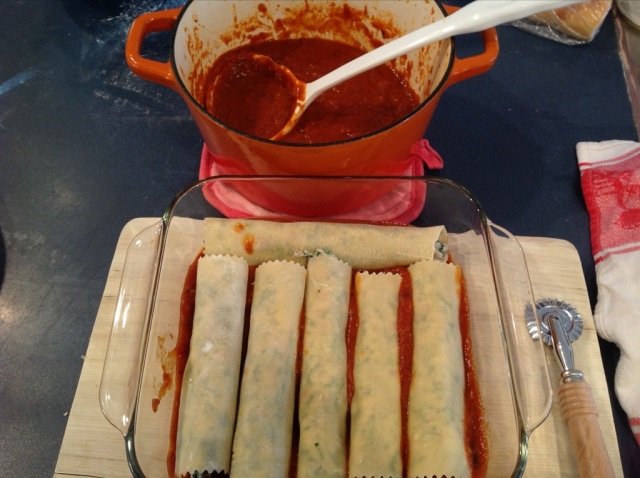
Place the finished cannelloni seam-side down in the sauce and continue with the remaining pasta sheets & filling.
When all the cannelloni have been filled, pour enough sauce over top to completely cover everything and top with parmesan & mozzarella cheese.
Cover the dish with foil and bake for 1 hour, remove foil and bake for another 15 minutes.
Remove cannelloni from oven and let stand at least 15 minutes before serving.

Homemade Pasta!

I did it!

I’ve successfully made pasta from scratch!

T be honest, this isn’t exactly my first go at pasta, but it is my first time using my brand new toy!

For Christmas this year I got the highly coveted (to me) pasta attachments for my Kitchen Aid mixer from my brothers. I’ve been pining over this set of toys for 10+ years and am now, finally, the proud owner of a motorized pasta-making machine.

I have made fresh pasta from scratch in the past with my hand-cranked pasta maker, but with SALLY, it just becomes exceedingly more difficult to do as time goes on. Pasta making is something I’ve always enjoyed doing and now that I have the sheet roller to use at the twist of a finger, I am even more excited because today we stopped at Lina’s Italian Market to get me a few more toys. Behold! My new collection of pasta-making toys:

20121230-193022.jpg

I am now the proud owner of a ravioli press, a couple of ravioli cutters, a fluted-edged pastry/pasta wheel, and a gnocchi board! The only thing we didn’t pick up, which I am now lamenting because of misunderstanding on my part with The Hubbs, is a pasta drying rack. Yes, as much as it would seem that it’s a useless piece of equipment taking up room in my kitchen, I discovered that I desperately needed one to keep all my strands of pasta separated for drying. Case in point, pasta drying on a wrapping paper tube, wedged between 2 kitchen chairs:

20121230-193312.jpg

Perhaps we will make another trip back later in the week, unless Dad magically comes up with a pasta drying contraption between now and my next round of pasta-making.

I was originally supposed to be making ravioli for part of NewYear’s Eve Dindin, but I couldn’t figure out how to serve a double round of pasta without people passing out from carbo-loading with Mom making shortrib spaghetti as our main attraction for the evening. My plan was that I would make a chicken, ricotta & spinach-filled ravioli and serve it in a light broth as a starter, but that just might be too much with all the other planned treats like cheese, bread, meats & antipasti. So I am going to ixnay the ravioli for another day and just make some homemade linguini to go with Mom’s sauce, instead.

Here’s what we had for dindin tonight: linguini with ~my~ version of shortrib spaghetti sauce — and it was pretty darned fantastic ^_^

20121230-194152.jpg

Basic Egg Pasta Dough — care of Mr.Jamie Oliver
100g flour, per person
1 egg, per person
Water

Place the flour on a board or in a bowl.
Make a well in the centre and crack the eggs into it.
Beat the eggs with a fork until smooth. Using the tips of your fingers, mix the eggs with the flour, incorporating a little at a time, until everything is combined.
Knead the pieces of dough together – with a bit of work and some love and attention they’ll all bind together to give you one big, smooth lump of dough!
Let the dough rest at least 30 minutes on the counter, covered.

Acorn squash gnudi with butter & sage

I am so incredibly glad I made the effort to make this recipe.

It comes from the Williams Sonoma website and originally called for butternut squash, but I figured making this minor change didn’t matter much.

20121012-200014.jpg

The texture of these little dumplings can honestly be described as pillowy, which is something I never imagined possible. You always read about something being pillowy, but I figured anyone using that description with regards to food was just being… Weird.

I’m also amazed at how delicate these taste. They’re just so… nice! The sweetness of the squash isn’t overpowering like sweet potatoes and yams are, it’s just nice and subtle. And now that I’ve tried brown butter and sage for the first time in my life, I can honestly say it’s not for me — it’s just too much.

I cooked all of the gnudi, but only served about half — after boiling everything, I removed them to a cooling rack set on top of a baking sheet so they would cool quickly. The gnudi I didn’t serve for dinner tonight ended up being put straight into the deep freeze, still on the baking sheet but lined with parchment, so they wouldn’t stick together as one large mass when put into baggies for a later meal.

My hope is that they will taste just as good the second time around after a quick dunk into boiling water to reheat, then serve them with some tomato sauce and perhaps, as The Hubbs requested, a crispy pork cutlet on the side.

Acorn Squash Gnudi

2 acorn squash, about 3 lb total weight
2 eggs, lightly beaten
1/4 tsp. freshly grated nutmeg
1 tsp. fine sea salt
Freshly ground pepper, to taste
2 cups flour, sifted

Butter
(10) fresh sage leaves
salt & pepper
Parmesan cheese

Preheat an oven to 450ºF. Line a rimmed baking sheet with parchment paper and brush the surface lightly with olive oil.

Cut the squash in half lengthwise, remove & discard seeds.
Place the halves, cut side down, on baking sheet & bake until thoroughly tender when pierced with the knife, about 40-50 mins.
Remove from the oven and scoop out the flesh when cool enough to handle into a large bowl.
Mash squash with a potato masher until smooth and leave until cold.
Add the eggs, nutmeg, salt and pepper to the squash and mix well.
Slowly resift the flour into the squash while stirring with a wooden spoon until well mixed.
Cover and refrigerate for at least 1 hour or up to overnight.

Warning! The mixture is very soft & sticky but is cohesive enough to make little dumplings.

In a large pot, bring lots of salted water to a rapid boil.

To form gnudi, use a wet ice cream scoop to divide dough into portions and place on a parchment lined baking sheet, then “cut” each portion into quarters with a wet spatula. (The water will make it so that the dough doesn’t stick as much to everything.)

When ready to cook, use two wet spatulas to gently roll the quartered gnudis into a cylindrical shape on the baking sheet before dropping gently into boiling water, using the spatulas.
Remove gnudi from water when they float to the surface and transfer to a wire rack to cool while cooking the remaining gnudi.

In a large frying pan, melt the butter over medium low heat and add the sage leaves.
Add the cooled, drained gnudi and cook until warmed through & slightly crispy and golden brown on the outside.
Serve immediately and pass the cheese at the table.

Spaghetti alla Puttanesca

*drooooooooooool*

OMG So yummy.

This is probably, officially, one of my most favourite and super simple pasta sauces to make, ever. It’s kind of funny, because I’ve been making something similar to this for a few years now, but just with garlic, hot chili flakes & olive oil. This version, is just an amped up variation that totally blows it out of the water and I am super duper obsessed with it.

The name spaghetti alla puttanesca roughly translates to "whore’s style spaghetti". The recipe is super fast and super simple. Admittedly it’s all canned or preserved stuff, but it’s just so incredibly addictive. I ate a huge bowlful last night (well, huge for me) for dindin and I desperately wanted seconds, but was too full to even try… but I wanted seconds, damnit! I kept obsessing about it all night long, hoping I would get hungry enough to have a bowl for my late night snack, but it never panned out. So I’ve had my second round for breakfast this morning.

Recipe is so fast it can be put together in less time than it takes to set water on to boil and cook the pasta. If you like salty, spicy and assertive flavours, this is the recipe for you. All the ingredients are pantry staples, so this is also a great recipe for days where you want something fast, easy, satisfying and NOT just a bowl of pasta doused with a jar of store-bought spaghetti sauce. (Of which, I should mention, we never actually have jars of premade sauce in our pantry, only cans of whole tomatoes. Jarred sauce is a rarity around our house.) No measurements, since I just eyeballed this, though if you want an official recipe to follow, check out Mario Batali’s Penne alla Puttanesca. This is the recipe from his cooking app that I got super excited from. Another version to try which I also kept in the back of my head, and who’s name amuses me greatly, is Nigella’s Slut Spaghetti. Maybe I should call mine Seriously Slutty Spaghetti? ;D

Spaghetti alla Puttanesca

1 can whole tomatoes
olive oil
minced garlic, lots (like a heaped spoonful)
anchovies, chopped
capers, drained
black olives, pitted
hot chilli flakes
spaghetti

Bring a pot of water to boil and cook your spaghetti to your desired texture
In a large skillet, big enough to accommodate adding in the spaghetti, warm the olive oil over medium heat.
Add chopped anchovies, capers, garlic, black olives and hot chilli flakes.
Turn down the heat and stir everything together, mashing the anchovies a bit.
You might want to consider using your splatter guard here, everything spits if your heat is too high!
Carefully pour in the juice from the tomatoes to the pan and squeeze the life out of each tomato with your hand before adding to the sauce.
Yes, I said use your hands. It might take a bit to break up each tomato sufficiently, take your time and watch out you don’t squirt juice all over yourself like I did. It can be messy.
After all the tomatoes have been added to the pan, stir everything together and let simmer while your noodles continue to cook.
Taste for seasoning, though the likelihood of needing to add salt is probably nil.
If anything, you may want to consider adding a bit of the oil from the anchovies if you’re like me and you want more flavour.
Drain the spaghetti, saving some of the cooking water to loosen the sauce, if needed.
Add spaghetti to the sauce and mix well so the noodles absorb all the liquid in the pan and suck up all the wonderfulness.
Serve in large bowls, making sure there’s some goodies (capers, olives and tomatoes) in each, and be happy.
You can serve this with parmesan, but to be honest, I think it’s totally perfect as is and cheese might actually be kind of weird, texturally.

Bored…

Bored bored Bored bored Bored bored Bored bored Bored bored Bored bored Bored bored Bored bored Bored bored Bored bored Bored bored Bored bored Bored bored Bored bored Bored bored Bored bored Bored bored Bored bored Bored bored Bored bored Bored bored Bored bored Bored bored Bored bored Bored bored Bored bored Bored bored Bored bored Bored bored Bored bored Bored bored Bored bored Bored bored Bored bored Bored bored Bored bored Bored bored Bored bored Bored bored Bored bored Bored bored Bored bored Bored bored Bored bored Bored bored Bored bored Bored bored Bored bored Bored bored Bored bored Bored bored Bored bored Bored bored Bored bored Bored bored Bored bored Bored bored Bored bored Bored bored Bored bored Bored bored Bored bored Bored bored Bored bored Bored bored Bored bored Bored bored Bored bored Bored bored Bored bored Bored bored Bored bored Bored bored Bored bored Bored bored Bored bored Bored bored

OMG I am bored. I wanna do stuff, but I don’t know what to do because my brain is all kerfuffled with The Moose. I’m like a hummingbird flitting here and there and everywhere. Oh! Shiny! Oh! Pretty! Oh! OH! OH!!!

*sigh*

I spent all night last night and am still working on my noodle shop picture and will probably post it when I’m finished. It looks pretty simplistic, but holy cow does it take a long time to do! I also wish I had the ability to copy, cut & paste, but have no idea if that’s even a possibility. It would certainly make drawing tables & chairs faster. Given that I am no artist to begin with and I’ve not learned how to use any painting or drawing apps to their full capacity, I am probably doing it all wrong which is why it’s taking me so long to do this.

I have to say, it’s cute looking and it’s terribly amateurish, but it’s mine and I’m rather proud of it.

A friend I used to work with at the spa suggested that I come up with a cute uniform so she could waitress in my imaginary noodle shop. At first I thought perhaps just a black dress code: tshirt & pants/skirt, but then I figured I should at least make it something more visually recognizeable so patrons would know who to call over if they need something and decided on just an apron. Something cute though, with maybe a ruffle at the bottom, 2 front pockets to stash stuff in and a logo on the chest. Cooks would be wearing what is called a happi coat. The big conundrum at this point is what kind of logo? I’m still pretty stumped on this one since I am not creative enough to think of something adorably cute and awesome.


Silly noodle pics, cuz I can

And then Brit-BIL left me a message on FB this morning saying that I should use the FSM as the logo with the saying “May you be touched by his noodle-y appendage” or something equally silly & cheezy. He admitted that it was too hard to resist suggesting FSM even though it was the wrong kind of noodle. To be honest, I thought it was hilarious. And given that this is just my imaginary noodle shop, there’s no concern about stepping on peoples toes or copyright infringement, etc, etc, etc so we’re all good! (At least, I think I’m good… right?)

Now that I’ve gone and thought things through and am more into considering my imaginary noodle shop will eventually come into fruition, even if it’s just on paper for my own amusement’s sake, I’m starting to think in more detail about that waitress outfit. Since there really is no concern about what is or isn’t proper or socially acceptable, I’m figuring everything’s fair game.

I started thinking that perhaps a tamed down Gothic Loli outfit might actually be a way cuter uniform to have than just an apron. Thing is, I’m not into the whole super-duper-girly thing and I can do without the excessive emo. So perhaps it would be more like a “hint of gothic loli” as opposed to full-on costume. I am way more low key, which is the problem. Question is: where/how to find a happy medium :P~

Maybe I should be considering more of a 50’s diner outfit. That is actually more up my alley and what I am thinking of, more so than the Goth-Loli…. but then… Ugh.. the style rather clashes with my cooks’ happi coats and the fact that this is a noodle shop, not a diner.

Actually, you know… there is a Japanese apron style that I like that’s slightly different that I think looks really cute. So really, I could stick with my original apron theme and it would still be considered rather cute with a logo front and centre on the chest. Hrmmmm…. in fact, as super embarassing as this is, I really like the style of the Hello Kitty Airlines uniform. If you change the logo and change the colour of the apron, that is exactly the uniform I think I would like to have for my waitress. Cute and functional. Not quite as risquee as a Gotchic Loli costume, but it’s still sweet to look at.

I think that pretty much settles it ^_^

Dream I have…

In another, healther, lifetime, I would like to open a wee little shoppe.

Like a hole-in-the-wall noodle shop that’s just big enough to hold one of those long stainless steel hot table-cookers so I could make okonomiyaki, noodles and gyoza in front of customers. There would with stools around the perimeter of the counter and maybe a handful of tables along the wall that each seat 2-3 more people. And we’d serve lots of cold beers to go with the food…

I would like for there to be 2 cooks and 1 waitress. Two waitresses might be overkill for the size of establishment I am dreaming of, especially if I am capable of doing some of the running work myself. For the cooks, it would be either myself, along with a second cook or else two cooks dedicated solely to kitchen, then I could be the resident hostess “boss lady” of the shop to greet people as they come in and be the last person to wish them well as they leave happily with warm, full bellies and higher, happier spirits.

*sigh*

Another lifetime, perhaps….

Wow.. crazy yum o_O;;

UHmmm… this is sort of an “out of left field” recipe that I honestly didn’t know would be SO tasty o_O

I mean, it’s obviously gotta be somewhat palatable, given it’s in print in Nigella’s new book Kitchen, but wow. I am rather boggled as to how tasty this is.

Marmite Spaghetti.

Ya. Srsly.

The sauce is more like a “flavour-stain”. Meaning, that it colours the noodles, but it doesn’t bathe in it. In fact, it just covers it. The noodles soak up just enough sauce and then sits slickly in a bowl, but doesn’t drown. Pair the noodles with some super-crispy pan-fried tofu and you can call it a day.

I am seriously impressed… and now serioiusly full and I haven’t even finished the single portion I made.

Ingredients-wise, there are three for the sauce. Four if you count the pasta water.

Marmite Spaghetti
1 Tbsp Butter
1 tsp marmite
parmesan cheese to taste
hot pasta water
spaghetti

All you have to do is melt the butter, melt the marmite in the butter, adding a couple tablespoons of hot pasta water to help it along plus loosen everything up, then add parmesan cheese to taste.
When you drain the noodles, don’t drain them dry, leave them rather wet. In fact, if you can just scoop the noodles out of the pot and straight into the sauce with whatever water’s clinging, that would be the best way to go because then the flavour of the sauce will dilute further and become absolute perfection.

And like I said, pair that with the crispy-crispy tofu, you’re pretty much set. I originally made a dipping sauce of equal parts rice vinegar & soy sauce, but having tasted the noodles and then followed with a bite of tofu, you don’t actually need it. The flavour from the marmite sauce transfers nicely over when you’re eating the super bland tofu.

So that’s my brefus for today… and now I’m left with a ridiculous amount of tofu since I only ate three pieces :P

Hamburger Stroganoff

When The Hubbs & I make homemade hamburgers, we always end up with at least 2 leftover burgers which tend to sit around the fridge uneaten unless someone absolutely has to. This is the recipe I’ve always had in my head but never quite knew how to make in reality. I don’t know how I finally figured it out, but I think it probably involved lying awake one night because of The Moose. It is incredibly yum.

When The Hubbs makes hamburgers (I do the grilling around here, now, it would seem): mix a 1lb package of ground beef with 1 egg and 1 package of roast onion soup mix, shape it into 4-5 patties. When I grill the burgers, I salt & pepper the one side that is going immediately face down on the hot grill and then do the same thing for the other side when it’s getting flipped over. And yes, we cook our burgers well done. Even though I am a huge fan of the medium rare steak, I can’t really stomach the idea of eating a medium rare burger, that just seems wrong.

It’s not authentic, but the stroganoff was super yum. There is no other way of describing it. I’m ridiculously pleased at how fantastic it tasted and amazed that we both ate as much as we did given how small our meal sizes tend to be. The recipe’s simple and basically used everything I had leftover in the fridge with the exception of having to buy some sour cream last week. Now I am very excited to have leftover hamburgers just so I can make stroganoff. The amounts I’ve given below used only one patty and was more than enough meat for our liking. This was enough for The Hubbs and I to each have a decent portion for dindin and then 2 portions remaining for him to have for lunch during the week. Given that our hamburgers are about ~1/4lb each, I would say that using two leftover burgers would probably make for an overly meaty stroganoff, if there’s such thing, but do what you would like best.

Hamburger Stroganoff

1/2 pack of egg noodles
1/4 cup butter
1 leftover hamburger (nuked for ~30 seconds just to take the excess fridge cold, off)
1 heaped spoonful flour
1 1/2-2 cups beef broth (1 spoonful of beef bouillon dissolved in hot water)
1/2 cup sour cream (or more, to taste)
1/2 cup frozen peas
1 Tbsp smoked paprika
garlic salt & pepper, to taste

Put a pot of water on to boil and cook egg noodles until desired doneness.
Meanwhile, put a skillet over medium heat and melt butter.
Once the butter starts to melt, add the hamburger and break it up with a potato masher until it’s completely uniform.
Add the heaped spoonful of flour to the meat mixture and cook until the flour is well incorporated.
Add a generous amount of smoked paprika & pepper to the meat and stir well to combine.
Pour in the beef broth and stir until thickened, adding a little extra water if it needs it.
Turn off the heat and stir in the sour cream until completely mixed through. Stir in peas.
Taste sauce and season with garlic salt and extra paprika, if needed (I probably used somewhere around 1Tbsp total).
Serve over egg noodles.

Successful salmon dinner

I have to admit, I don’t actually like salmon much. I’ve always found it rather excessively dry and or fishy tasting. If I do eat salmon there are less than a handful of ways that I enjoy eating it — sashimi/sushi (#1), wrapped in bacon, steamed fish heads/tails/collars. I’d like to say that I like to eat it when my mom just salts, peppers and drowns it in butter before baking, but the truth of the matter is that she cooks it until it’s dried out, and for me, that doesn’t make for good eats. My brothers enjoy it that way, but then I think they try and scoop up as much of the butter puddles as possible for their salmon when eating.

So here’s the weird thing: Monday morning, when I was driving down to the lab for my monthly bloodwork, I saw a big huge sign for Co-Op saying that wild salmon was on sale for $2.50/kg. Ordinarily this wouldn’t be of interest for me, but summer seems to be a good time to experiment with cheap and abundant foods.

Yesterday, I went shopping with mom and we stopped at Co-Op and were told that the truck delivering the salmon never arrived, it seemed to have gone missing. Boo for me :( So we eneded up going to Superstore to see what they had on offer. I eventually got myself a small piece of fish (about 350g), just enough for dinner and a little bit for leftovers, but certainly not what I was hoping for, which was a couple of nice sides that I could slice into individual portions and freeze for the next few months, and certainly not nearly as cheap as what Co-Op had been advertising.

Since seeing that sign on Monday for the cheap salmon, I made it my mission to find a recipe that would make the fish moist and super tasty. While I do enjoy the bacon-wrapped salmon that I’ve made in the past, I’ve never quite been able to make it so that the meat doesn’t dry out, so it’s something I’m going to have to work on.

So this is what I found: Baked salmon with capers

Served with: Spaghetti with garlic oil & pancetta

And a side of: Stir-fried broccoli

Three words: Oh. My. Wow.

Really, that amazing. I had it in my head that I wanted to make poached salmon, I don’t know why, but I did. I figured a moist-heat method would be a better plan for the salmon, given I really do like my steamed fish heads. At first I thought the recipe ~was~ poached, but after re-reading it, it turned out to be baked… at least that’s what the recipe states.

I am glad to say that because the fish is cooked in a foil pouch, all the moisture is retained from the veggies and so it ends up being essentially a steamed dish in the end. So yummy.

Here are the changes I made:

Salmon with Capers
Salmon filet (~350g is what I had)
Olive oil
2 Green onions, chopped
2 Tbsp Capers, rinsed
1 Tbsp Fresh dill, chopped
Lemon Pepper
4 Tbsp Butter

– Preheat oven to 400F.
– Lay a sheet of tin foil out, large enough to completely enclose the fish.
– Oil lightly with olive oil and place salmon on top, skin-side down.
– In a bowl, combine green onions, capers and dill. Set aside.
– Generously season salmon with lemon pepper (until you can’t see the salmon!)
– Top the salmon evenly with a thick layer of the onion-caper-dill mixture.
– Lay butter on the greenery and wrap the fish tightly so nothing can escape, but leave room to spare on top for steam to circulate.
– Put package on cookie sheet and throw into oven for 20 minutes.
– Be careful of hot tin foil and steam when opening fish package for serving.

As to the spaghetti, the only change I made was to halve the recipe, use real garlic, and season with garlic salt and lots of pepper in the end. Because I only used half the pancetta, there wasn’t enough saltiness for my liking, hence the use of the garlic salt… and I think I might be addicted to pepper in my pasta, so I used lots of fresh ground pepper in the recipe before serving, too. I’m so glad we have leftovers, it was really tasty — especially with the broccoli!

I will definitely be making this again.

Tonight: Prime rib steak currently marinating in olive oil with lemon zest, fresh thyme & rosemary + kosher salt & lots of pepper. Hoping that we can BBQ that sucker on the little baby hibachi tonight. ^_^ I have 2 potatoes that I was considering baking and serving with sour cream and green onions, but I’m thinking that I might want rice…? I dunno. Will have to see what The Hubbs feels like.

More experimenting…

I’ve decided to try something crazy and different for dindin tonight using the pulled pork I made yesterday. FINALLY, a recipe for pulled pork that doesn’t involve BBQ sauce or coleslaw. Pasta, my love, here I come!

The original recipe is called Orecchiette with Pulled-Pork Sugo and it reads fairly interestingly.

Changes I’ve made so far:
2 loosely packed cups of pulled pork, straight from the crockpot
1 can of whole stewed tomatoes, crushed
2 cups chicken stock + 1 Tbsp apple cider vinegar
omitted wine
1/2 cup navy beans
parmesan cheese
rotini or penne for serving

Followed recipe instructions as written, but omit adding the pasta. My pulled pork wasn’t 100% fall off the bone tender when I took it out of the crock to refridgerate overnight last night, so this morning I removed all the fat from the top of the gelatin and tossed the pork back in. The pulled pork had been going in the crock for about 3 hours when I pulled two cups of the meat out for the sauce. When I mixed the pork into the sauce, I shredded it as much as I could (still felt a little “under done”), then turned down the temperature to low and have left it bubbling away on the stove. I am planning on letting it do its thing until dinner time, so the total simmering time for the sauce will be about 3 hours, give or take. So far the sauce, while still a little loose, tastes pretty yummy and will be even better served over pasta with the parmesan cheese and glug of olive oil.